
For any home project, be certain to follow local code and permitting requirements.
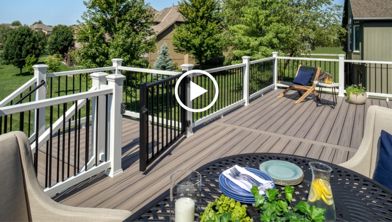
Whether you’re looking to add ambiance or functionality to your outdoor space, the right deck lighting is one of the most impactful enhancements you can make to your deck.
Learning how to install low-voltage deck lighting is fairly simple, provided only that you use a low-voltage lighting system and carefully read all manufacturer instructions.
The best part? Unless you have to run additional line-voltage circuits to feed a transformer, you probably won’t need an electrician or contractor for even a fairly elaborate deck lighting installation..
Develop a Lighting Plan
It's important not to skip over the planning phase when installing any low-voltage deck lighting — that way you can make sure the lights are properly positioned and connected to a 12V transformer.
Start by identifying the AC power sockets where you'll plug in the transformer. These outlets must be ground fault circuit interrupters (GFCIs) — a type of outlet designed to automatically shut off power to avoid shocks and other hazards.
After you've identified your outlets, plan out the locations of your lights, power supply, timer, and dimmer. They should be in spots that are easily accessible for service. Dimmers should be placed in a dry location within a 30-foot radius of your power supply. Timers must be installed vertically with the receptacle facing downward and at least one foot from the ground, per federal safety code.
Once you've completed your plan, start measuring the approximate lengths of the necessary wiring to run your lights, and count the number of transformers you might need for your project.
Connect Your Transformer
Low-voltage deck lighting systems will require a deck lighting transformer, which is used to convert the ordinary household “line voltage” (120V) produced by an electrical socket. Most installations call for 12V transformers, so you only have to ensure the transformer you choose can withstand the total wattage of all connected lights (most manufacturers have more than one transformer size).
Selecting a Transformer
Not all 12V transformers are created equal. Some, often less expensive transformers, are simple “step-down” units that take 120VAC and step it down to 12VAC. The other option is to use transformers that change the voltage type from AC (Alternating Current, like your home uses) to DC (Direct Current, like your cell phone charger) while reducing the voltage from 120V to 12V.
It’s important to know which type of voltage (i.e. AC vs DC) your lighting fixtures take, as the wrong voltage type can cause major component failure and other performance problems (and may even void your warranty).
It’s also critical that you never mix AC and DC fixtures on the same circuit. For this reason, it’s recommended to use the same brand of transformer as the light fixtures and to stick to one brand of fixtures.
When you're installing Trex® LED Deck Lighting™, keep in mind that Trex does not warrant or support the use of non-Trex transformers and dimmers. Use Trex transformers that are specifically designed for the voltage and type (DC) requirements of Trex lights to avoid potential component failures and warranty issues.
The transformer you choose will also determine how many lights can be connected to a single transformer. For example, a 8.3A transformer can power a maximum of 79 Trex LED Deck Lights, while a 2.5A transformer can power 27.
Use Trex's interactive online Lighting Transformer Calculator to make sure you don’t overload the transformer. Overloaded transformers can fail prematurely and cause fixture performance problems.
Ensuring Proper Wiring
If you have a long wire run (for example, over 300 feet) you might consider sourcing your own wire and stepping up to 16GA UL-listed outdoor rated 2 conductor wire. This can solve a problem called "voltage drop."
The longer the electricity has to run, the more energy it loses at the end of the run. If you use a thicker (or lower gauge) wire, you will minimize the chances of this happening.
If the system you’re installing uses a proprietary plug-and-play installation system, it’s normally appropriate to cut and hardwire the connections (but always check with your manufacturer for more information).
Install Wire Splitters
Some systems, such as the Trex Lighthub® system, use wire splitters to eliminate the need for cutting and splicing. If you order Trex lights, you'll receive a 5-foot wire with each fixture — all you need to buy are the splitters and the wires that connect each splitter together.
Wire splitters transform one female connection into several, which makes adding them necessary along the inside of every post base where you want lighting. When installing your wire splitters, there are few things you'll want to keep in mind:
- It's recommended that you install your splitters before adding decking or railing for easier access.
- Don’t fully attach the splitters to the joist. Leave them loose so you can maneuver them as you insert the Lighthub® plugs.
- Don't use an extension cord between the electrical outlet and the transformer. Rather, connect the transformer directly with the power outlet. If the transformer cable doesn't reach the splitter, you may need a wire extension cable designed to connect after the splitter.
- Ensure the circuit the lighting is installed on has active and functional GFCI protection. This prevents spikes and other electrical anomalies from frying your lighting system (although massive spikes like lightning strikes are impossible to fully protect against).
Staple Wiring to Deck Frame
Hiding wiring is critical for both safety and aesthetics. In most circumstances, your best option is to attach the wiring directly to your deck’s frame — almost any place that’s out of sight.
When stapling your wiring, never drive staples all the way in. Your wire should be able to move under the staple to avoid potential issues. You should also always use cable-safe staples or fasteners. Typical metal staples (for example, T50 type) have a high likelihood of penetrating the insulation of the wire and causing shorts.
Make sure to run the wire under your decking structures and behind stringers. Running it between your deck boards and joists can lead to connection issues and could damage the wire.
Install Your Deck Lighting
Depending on the deck lighting options you choose, there are some best practices to keep in mind when installing each one:
- Power on: The No. 1 tip for Trex® Deck Lighting™, whether you're using plug-and-play or splicing wires, is to install with the power on. It’s essentially troubleshooting while installing.
- Check compatibility: Always confirm with the manufacturer if you plan on using a different brand — just to make sure this method is safe with their system.
To maximize value, consider premium options, such as the Trex® Deck Lighting™ dimmable and weather-proof features that can stretch the usefulness of your light fixtures.

Adding Post Cap Lights
Post cap lights offer a touch of illumination at the top of your railing. These lights are useful for those looking to show off the quality of the railing and add a vertical layer to their lighting setup. To install post cap lights, follow these steps:
- Feed the wiring that will power the post caps from below your deck. It’s best if the post sleeve isn’t on the 4-inch-by-4-inch post when you feed the wire through. If your post is there, the process is more difficult as the passage you have to run the wire through is small.
- Use a cable staple (or painter’s tape) to hold the included 5-foot wire in place.
- Install your railing system, post sleeve skirt, and the post sleeve over the post.
- Connect the wire under the deck to the splitter, then plug in the cap light, making sure it works before attaching to the post with silicone caulk.
Remember to leave slack in the wire toward the top of the post cap. Start with the post nearest to your power source, and finish by placing the sleeve back on the post. You can also try our Solar Post Cap Lights for a wireless option.

Incorporating Deck Rail Lights
Deck Rail Lights will generate indirect illumination from your railing, allowing you to show off your decking at night. To install post lights, you'll follow this multi-step process to avoid any potential issues:
- Before you install the railing, slide your post sleeve over the 4-inch-by-4-inch wood post.
- Mark the desired height and location for the light on your post sleeve. Center the location on the post sleeve and place a deck board on your framing to ensure your sleeve is at the correct final height.
- Drill a 1-inch hole through the sleeve and into the wood post underneath with a Forstner bit. Drill a deep hole so the location will be marked on the post itself.
- Remove the sleeve from the post.
- Drill out the existing hole ¾ of an inch deep.
- Drill a series of three 1-inch holes in a vertical line to create space to tuck away the wire and run it along the post, allowing the wiring to eventually connect with the splitter once the post lights are assembled. (Don't make this “pocket” horizontal; the screws that hold the post lamp will hit the wires and cause a short).
- Leave enough slack at the top of the lead wire and attach it to the post using heavy-duty tape.
- Fish the wire under the deck, connect it to the splitter, slide the post sleeve back on and tuck the rest of the included 5-foot Lighthub® wire into the pocket. Connect the light, screw the base into the sleeve and rotate the lens cover in place.

Fitting Wedge Deck Rail Lights
You can add wedge deck railing lights to your outdoor space for a sleek, understated design. These lights can be installed on both composite and aluminum sleeves and pair well with post cap lights. Here's how to get started:
- Find the ideal spot for your post and mark the location for your bolts.
- Use a straight edge to mark an X between the four bolt locations.
- Using a 9/16" (14mm) x 6" (152mm or longer) drill bit, drill a diagonal hole through your decking and blocking. Make sure your angle won't cause wires to get pinched by the support plate under your blocking.
- Mark where you'd like to place your wedge light on your post, then drill a 9/16" (14mm) entrance hole for your wire.
- Turn your post upside down and fish the provided 5' male-to-male wire through the hole in the baseplate.
- If you're only installing a wedge light, pull the wire through the hole you drilled in step 4. If you're also installing a post cap light, skip step 5 and run your wire directly through the hole you drilled in step 4 to the top of the post — connecting your wires with a three-way splitter.
- Connect the male connector to the female connector in your light housing.
- Place your light against your post and attach it with three screws to the backing plate.
- Slide the light cover down over your backing plate. Adjust screws as necessary to achieve a tight fit.
- Turn your post over and carefully fish your wire through the diagonal hole you drilled in step 3. Make sure the base plate doesn't pinch your wire.
- Mount your post per the manufacturer's instructions.
Installing Riser Lights
Riser lights add a level of safety to your stairs without interfering with your overall visual style because they're tucked away. Different stairs and lighting fixtures can call for different installations. As long as you follow manufacturer recommendations, you can use your own discretion when choosing the placement or riser lights. For most designs, risers are typically installed 4 inches above the track. Follow these instructions when it comes time to install your riser lights:
- Mark your selected location on the stair.
- Drill a 1-inch diameter hole all the way through the riser.
- Feed wiring through the hole and connect the riser lighting cable to the splitter behind the stairs.
Placing Recessed Deck Lights
To maximize lighting and minimize design interference, recessed deck lights are a soft, visually appealing deck lighting option. Each light offers subtle illumination and can be easily distributed throughout your entire deck.
When installing recessed deck lights, follow these steps:
- Identify the deck boards where you want to install the recessed lighting.
- Avoiding joists, drill a hole with a 1-inch diameter ¾ inches deep through the chosen board. Don't drill all the way through the board, as your light will fall through. The depth of the hole should match the depth of the lighting fixture you’ve selected, which will allow the lights to rest perfectly in your deck. If you accidentally make the hole too big, simply add a dab of silicone to the side of the light to keep it in place.
- Drill an additional ½-inch diameter hole through the bottom of the board in the same location as your first hole to feed the wiring. Ensure the light remains flush against the boards before finalizing the installation.
Composite decking will also expand and contract slightly, depending on the weather. So, if you're installing the light fixture when the temperature outside is warm, make sure the light fixture slides into place. If you have to tap or mallet it into place when the board is hot, the board can deform the light when the weather turns cold.
Close Off Unused Connections
After you’ve finished connecting your lights, you may still have unused female power connections. Unused splitter ports can be vulnerable to the elements, so all unused female connections should be closed using weather-resistant silicone or the plastic caps provided by the manufacturer.
Get Started on Installing Deck Lighting
Installing low-voltage deck lighting is an inherently safer choice than other high-voltage outdoor lighting options, and it makes decking light installation about as simple as plugging in a lamp. If you’re ready to start exploring your options for installing deck lights, take a moment to find a local Trex Dealer who can help.


This content was partially or fully generated by AI and has been reviewed by our team to ensure accuracy and relevance.
(NOT ALL PRODUCTS ARE AVAILABLE IN EVERY COUNTRY.)

Copyright © 2026 Trex Company, Inc. All rights reserved.
Photos and videos © 2026 Warner Bros. Discovery, Inc. or its subsidiaries and affiliates. All trademarks are the property of their respective owners. All rights reserved.
- Country
-
Australia
-
Austria
-
Bahrain
-
Brazil
-
Canada English
-
-
Chile
-
Colombia
-
Costa Rica
-
Cyprus
-
Czech Republic
-
Fiji
-
France
-
Germany
-
India
-
Ireland
-
Israel
-
Kuwait
-
 Lithuania
-
Mexico
-
Netherlands
-
New Zealand
-
Norway
-
Oman
-
Qatar
-
Saudi Arabia
-
South Africa
-
Spain
-
Sweden
-
Switzerland
-
Turkey
-
United Arab Emirates
-
United Kingdom
-
United States
-
Venezuela
By choosing your country, you acknowledge that you have read Trex's Privacy Policy